This is an animation technique that allows basic objects, or anything that may be moved, to look as if they are moving my them selves. This is done by taking a series of photos of the object and moving it slightly between shots so that when the images are played as a sequence it gives the object a smooth motion.
Examples - http://www.youtube.com/watch?v=Qv5-m9Yy9rA
- http://www.youtube.com/watch?v=z0QgGS5FK7w
Tuesday, 3 November 2009

Photomontage and Collage
This is the stitching of seperate photos to join and create a new image. This can be used to give the effect of objects and people in abscure enviroments; strange textures to an image or a tile/mosaic effect.
Martha Rosler - Stiches seperate real photos together to create the illusion of a new scene.

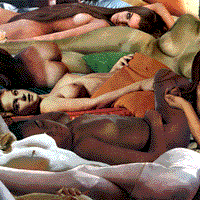
Radcliffe Baily - Creates a collage of photographs whilst using other media such as pen to transform the image further. It looks slightly like a 'mind map'.
Composition - 2nd Attempt


I used these 3 photos to create my new one beneath. After croping the section around my friend in each photo i used the 'Eraser' to get rid of any unwanted backgorund and dragged the figures in. The overlapping of the composited images was done by erasing some parts and not others.


Composition - First Attempt


I used these two images to create a new one by compositing the plane into the landscape.

Firstly i had to cut out the shape of the airplane, i did this using the 'magic wand tool' which was easy becuase of the white background it only selected the plane. I then 'copied' the selected area (Crtl +C) and 'pasted' it (Crtl + V) into the landscape image.

Firstly i had to cut out the shape of the airplane, i did this using the 'magic wand tool' which was easy becuase of the white background it only selected the plane. I then 'copied' the selected area (Crtl +C) and 'pasted' it (Crtl + V) into the landscape image.
I played around with the size and angle of the plane before adding a motion blur to the wings and back end of the plane. I did this with a 'Blur Filter' called 'Motion Blur'. I changed the angle of the blur to match that of the planes direction.
After this i selected certain areas of the foreground of the landscape such as the boulders and tufts of grass and added a more intense motion blur to them to give the effect that the camera was moving while taking the photo.
Friday, 23 October 2009
Wednesday, 21 October 2009
Changing Moods
 This is the photo that I decided to change the mod of. This original has a fairly positive mood due to the brightness of the photo and the blue sky and optimistic whites on the house.
 Firstly I made the image black and white the image on 'Enhance' but this had no great effect on the actual mood that the image portrayed other than a neutral one.
 I then 'Solarized' the image with a filter so that the image was negative. This gave me the mood that I was looking for as it now looks more intense and unfriendly. The white windows and dark sky look haunting and therefore oppose the of of the original image.
Tuesday, 13 October 2009
Warming Up Images

I wanted to use this image to practice warming up my photos, giving them a more pleasent mood.

Subscribe to:
Posts (Atom)